 Manage Suspect On Hand
| Document Version | v.3 |
|---|---|
| Document Last Updated | 11/2/2023 |
| Software Version Documented | v.9.9.2 |
Overview
This document will cover the Suspect On Hand Bin in Savance Enterprise, including how to set one up and when to use it. The Suspect On Hand Bin is a bin used to store items that are marked as "bad" or “unknown” (could potentially be bad.). We will also cover how to move these items back into stock if applicable and or start a return process with the vendor.
Managing The Bin
To manage your bins, go to Inventory > Warehouse Manager > Location Management. On the right in the Holding Bins section, the "Suspect On Hand Bins" section is displayed.

By default, the only bin in this section is the SuspectOnHandBin. You may add more bins by right-clicking the section header and selecting Add Bin. This will bring up the window seen below. The Full Location and Bin Type will fill in automatically, but you will need to fill in the Name and optional description.

You may also change the default by right-clicking on any bin and selecting Set as Default Bin. This determines which bin an item will be put in unless the user specifies a different one.
Bin Settings
There are a couple of settings that pertain to Suspect On Hand Bin. Go to Settings > General Settings > General > System. This will allow you to change the settings for the current PC. You will see that there is a drop-down box labeled "Default Suspect On Hand Bin" on the right. This will allow you to select from all Suspect On Hand Bins, which determines which will be the default for this PC.

Now if you move over to the Point of Sale tab, let's say you have the Point of Sale System box checked. Here, you can choose the Suspect On Hand Bin for POS. You can also determine the Default Returned Item Status, which will be detailed further in a later section of this document.

Returning an Order or Item
As an example, let's create a new Return Request. You may do this by clicking New at the top or by clicking Return Order / Item from the History tab of an Order. In the Return Request, you can add a part number that is being returned from the specified customer. The first thing you will want to configure is the "Status", which will determine where the item is to be placed and how it is to be labeled.
For example, if you set the Status to "Good", the Location will change to the default “Moving Bin”. If you change the Status to "Bad" or "Unknown", then the Location will change to the default “Suspect On Hand Bin”. Of course, these bins can be changed by the user if necessary.

Once you have configured everything, you may convert the Return Request to an RMA. If you are in Point of Sale mode, you may also issue a refund to the customer during this process. Remember that you can't revert a post in the receiver once you have credited the customer.
If you open up the Warehouse Inventory Log for this item, you will see that the "Suspect Bin On Hand" value will increase based on how many were put into the bin. This change was made as soon as you posted the receiver to Received. Note that these values will all reset if you were to cancel the Return Request for any reason.

Manage Suspect Return Items
Go to Inventory > Warehouse Manager > Manage Suspect On Hand > Manage Suspect Returned Items. Here, you can see a list of everything that is in the Suspect On Hand Bin.
Suspect on Hand Queues
Items appear within the Suspect on Hand queues with an item marked Bad or Unknown while entering a Return, or items are marked ‘Broken’ while receiving or picking materials in the warehouse.
You can create Vendor returns from the following Suspect on Hand Queues within the Warehouse Manager.
-
Manage Suspect Returned Items - Any items that have been marked Bad, or Unknown during the return process.
-
Manage Missing Items - Items missed during Shipping
-
Manage Broken Items - Any items that are marked broken during receiving.
-
Manage Item Exceptions - All items above
Manage Suspect Returned Items
-
Go to Inventory > Warehouse Manager > Manage Suspect on Hand

-
In the next screen among the options, you will want to pick Manage Suspect Returned Items.

-
It is here that you will be able to see all the returned items with a bad or unknown status that has not been processed yet.
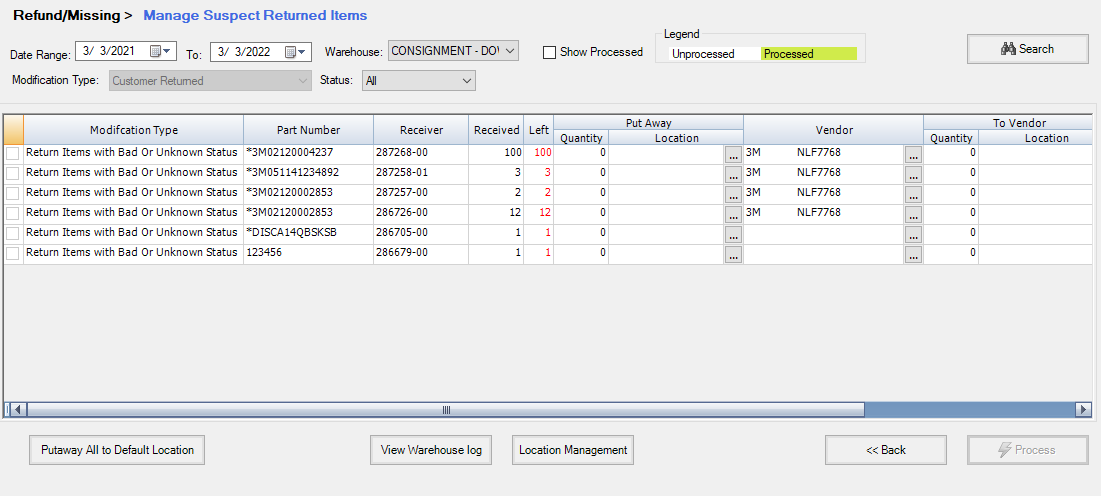
You have a few options as far as what you want to do with these items. If you determine that an item is actually good and needs to be put back on the shelf, you can put it away. To do so, select the Location in the Put-Away section to determine where you would like to put this item. Also, be sure to specify a quantity that you would like to put away.
 You can use the Put Away All To Default Location button. This button will automatically select all the default locations and fill out the put-away quantities for you. All you need to do next is hit the **‘Process’** button to complete the action.

If you would like to return an item to a vendor, you will first need to select the Vendor to return to. When you are searching for a vendor, the default vendors that are displayed are all the vendors related to this item's manufacturer (which is determined in Purchasing > Manufacturer/Vendor Relations). Then you will need to specify a quantity and the location to put it in your warehouse before it is returned (such as the ReturnToVendorBin location). When you hit the Process button, an unconverted Return To Vendor is created in the system with the items on it. You will need to find the RTV and convert it to finish the RTV process. You can find additional information regarding this in the RTV Core Process document.

The last option you have is to throw away the item. In the Trash section, you would select a quantity and then click the "..." in the Accounting section. This will bring up the window seen below. This will allow you to mark the item as a credit or a write-off. If you write the item off, your expense ledger account will be updated.
Otherwise, your customer will be credited for this item.

In the scenario that you are going to write off and trash an item you may need to do a stock adjustment to remove the quantity from the stock you have on hand.
To do a stock adjustment Go to Inventory>Inventory Manager>Item Manager

Search or enter your item number. When you locate the item, double-click on it.

While in the item Manager select the ‘Warehouse’ tab.

In the bottom left corner select ‘Stock Adjust’


While in the stock adjustment screen subtract the quantity that you are writing off in the field under the ‘New’ column. Next, in the ‘Info’ section you can write a comment, but you do need to choose a reason from the drop-down for the stock adjustment.
Finally, save your changes and your stock will now be adjusted to the correct quantity.
Once you are done, check each item that you would like to process, and then click the Process button on the bottom right. You will then be notified that the items have been processed successfully, and the items that were processed will be highlighted in yellow. Once you search again, these items will disappear (assuming that the Show Processed filter is unchecked).

Manage Suspect Items When Picking an Order
In a receiver for an Order or a RTV, let's say that you pick 1 of an item, yet there are 2 items allocated. Once you specify a holding bin location for this item and post this receiver to Picked, you will see the following window come up:

This message says that you've attempted to pick less than what was allocated. You have two options:
1) Leave the box checked. Then the inventory will be adjusted so that this order will not be processed in a backorder. This may be used if one of the items is missing or damaged.
2) Uncheck the box. In this case, a backorder will be processed for this item so that more can be purchased from your vendor.
We are going to check the box and follow the first option. Now the items have been moved to the Suspect On Hand Bin, and they have been removed from the order. Again, this is helpful if there are parts on the order that have been damaged or may be missing. You can then manage these items later to either move them back into the inventory, to ship them back to the vendor, or to trash them completely.
-
Where applicable, you can specify a vendor and the quantity you want to send back to the vendor. You would want to do this if the vendor is allowing you to ship the items back to them for reimbursement.
-
Choose the default return to the vendor bin.
-
When you hit the Process button, an unconverted Return To Vendor is created in the system with the items on it. You will need to find the RTV and convert it to finish the RTV process.

Manage Broken Items
-
Go to Inventory > Warehouse Manager > Manage Suspect on Hand
-
In the next screen among the options, you will want to pick Manage Broken Items.

-
It is here that you will be able to see all the items that have been marked as broken items within the receiving process.

-
Where applicable, you can specify a vendor and the quantity you want to send back to the vendor. You would want to do this if the vendor is allowing you to ship the items back to them for reimbursement.
-
Choose the default return to the vendor bin.

-
When you hit the Process button, an unconverted Return To Vendor is created in the system with the items on it. You will need to find the RTV and convert it to finish the RTV process.
Manage Item Exceptions
-
Go to Inventory > Warehouse Manager > Manage Suspect on Hand
-
In the next screen among the options, you will want to pick Manage Item Exceptions

-
It is here that you will be able to see all the items that have been marked as broken, missing, and returned items within the receiving, shipping, and return process.

-
Where applicable, you can specify a vendor and the quantity you want to send back to the vendor. You would want to do this if the vendor is allowing you to ship the items back to them for reimbursement.
-
Choose the default return to the vendor bin.

-
When you hit the Process button, an unconverted Return To Vendor is created in the system with the items on it. You will need to find the RTV and convert it to finish the RTV process.